Keyframes
Animation: from keyposes to keyframes
Keyframe animation is one of the oldest principles of creating computer graphics. It draws inspiration from traditional 2D animation, which itself is based on two main concepts:
- Pose to Pose Animation (as opposed to "Straight Ahead Animation")
- Inbetween images, also called "intervals"
Pose to Pose Animation consists of only drawing key positions during movement, like the positions of an arm during its swing. This lets you better anticipate the movement in time, and allows you to know the duration and the structure of a movement before defining its details.
Once this basic animation is complete (left) thus validating the intended movement, intermediate images are drawn (right), to make the animation more fluid.
The same principle applies today in the field of computer animation. Users can define key values for one or more parameters at specific points in time, and the software will calculate the intermediate images by interpolating these values.
Keyframes in Autograph
To practice using keyframes while reading this documentation, you can download these shuttle and landscape images and follow along.
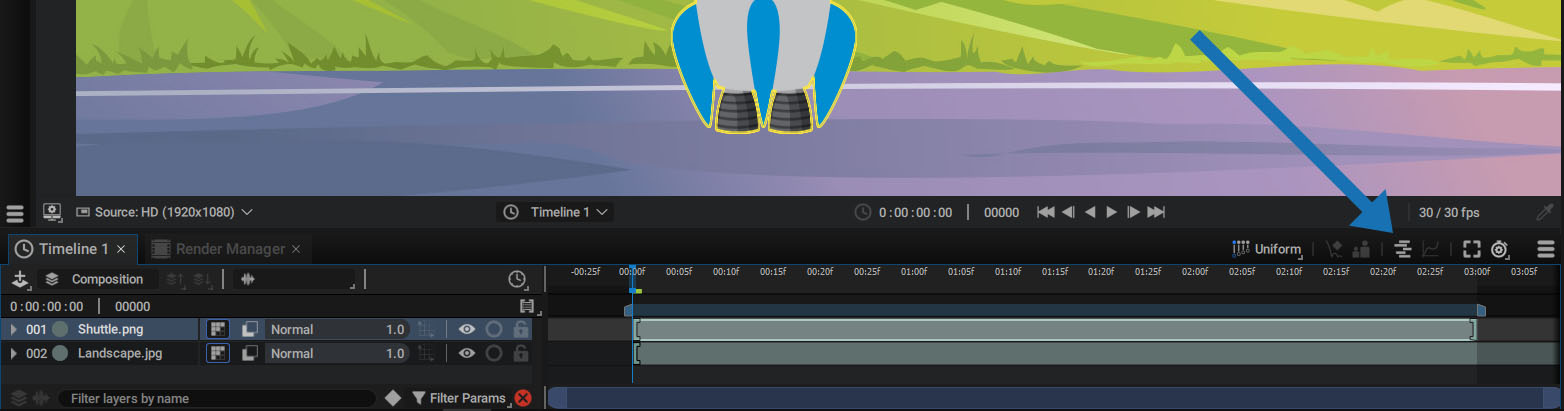
In order for keyframes to be visible in Autograph, make sure that the Dope sheet module is used in the Timeline, which is the case by default when the software is started. If not, click on the button on the right to select this module.
You can add keyframes to any parameter that can be animated. You can easily identify a parameter that can be animated through the presence of a button to the left of the Generator slot.
Since the same parameters are visible in both the Timeline and the Inspector, you can add keyframes in both panels.
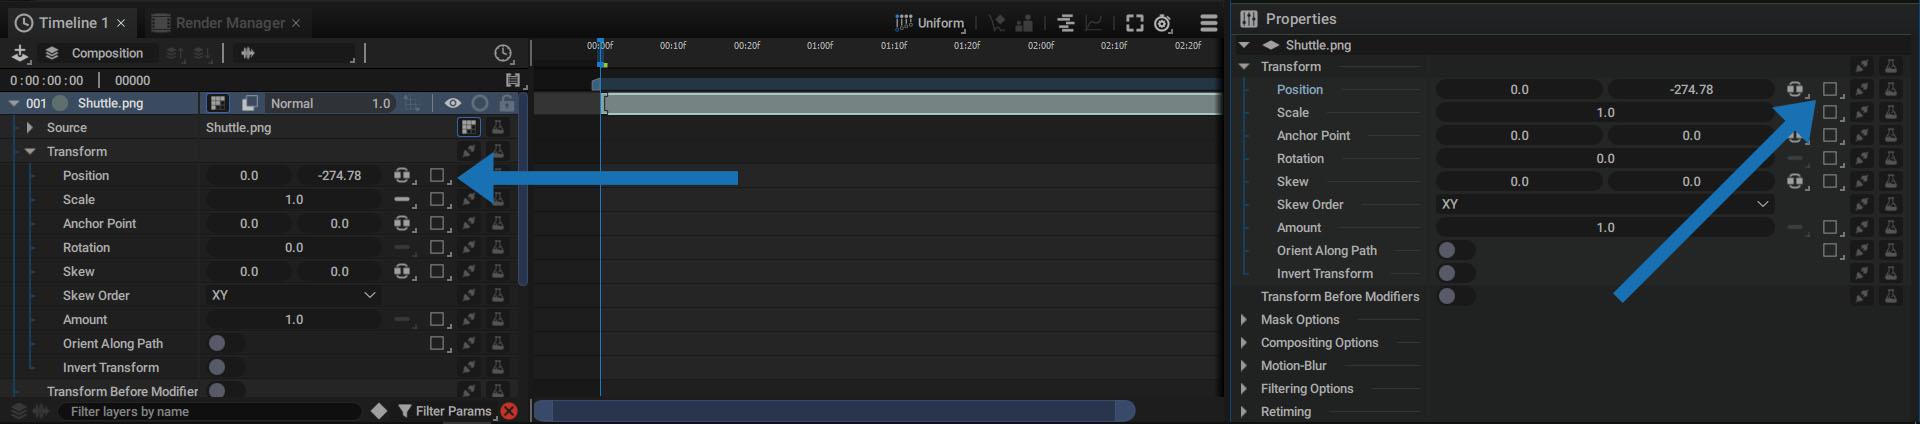
By default, this button contains a square, meaning that no key has been added to the parameter yet.
Adding keyframes
Creating a First Keyframe on a Parameter:
To add a first keyframe to the current time defined by the playhead, select a layer and select a parameter to animate. Just click on the square to display a pie menu made up of 4 parts.
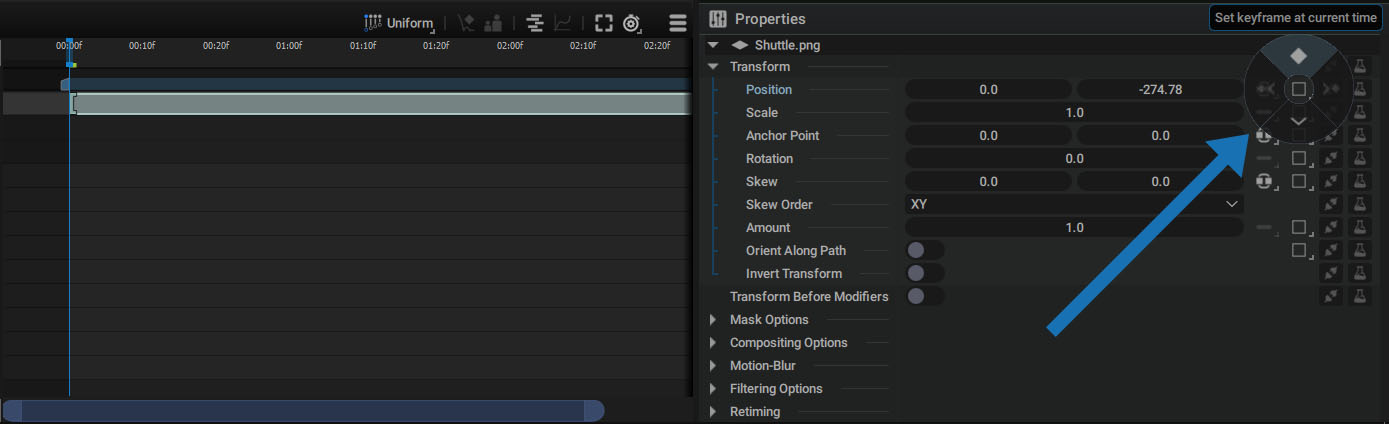
By moving the mouse upwards, we reach a diamond-shaped icon that lets us add a keyframe on the parameter.
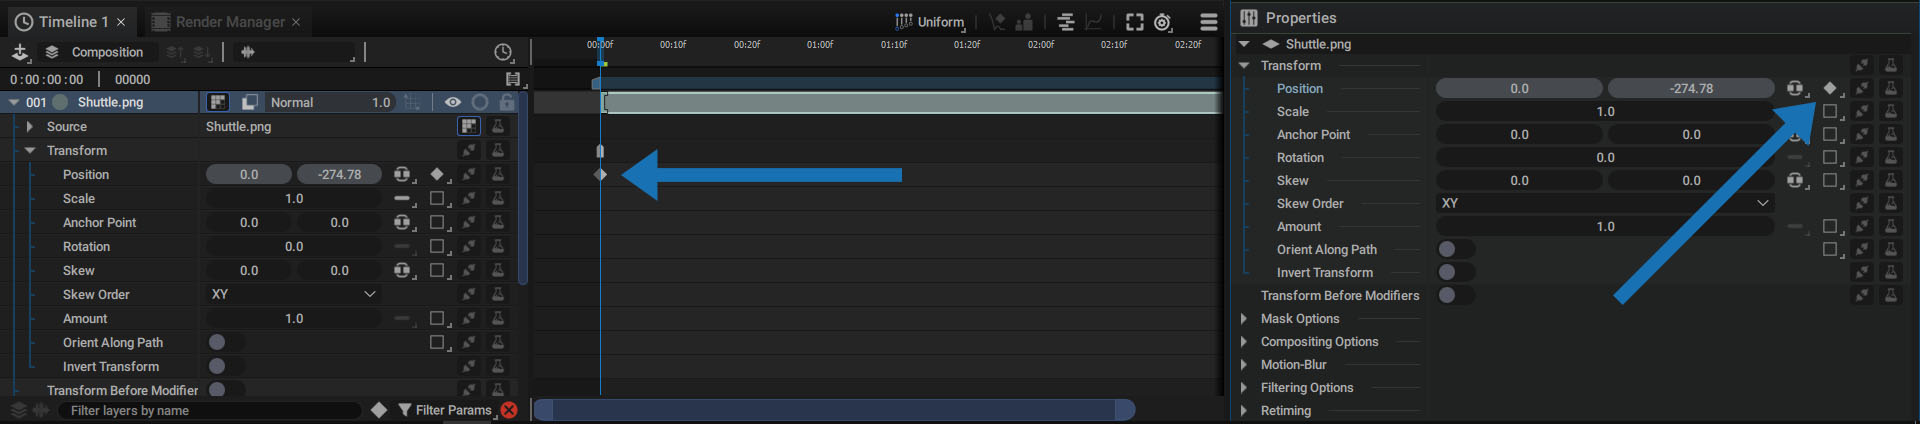
Once added, the pie menu will close and the square will be replaced by a solid diamond, indicating that:
- The parameter is animated
- A keyframe exists at the current time
We can also notice that:
- The first keyframe appears in the Timeline at current time
- The background color of the parameter values is now light gray
Note
If the playhead remains at the current time and the Position values are changed, the keyframe at that location will be updated with these new values.
Adding New Keyframes:
To create a new keyframe, simply move to a time in the Timeline that does not have a keyframe on this parameter and change the values. A new keyframe will be created automatically.
This change can be done either by changing the numerical values of the parameter or, in the case of Position, by moving the layer in the Viewer.

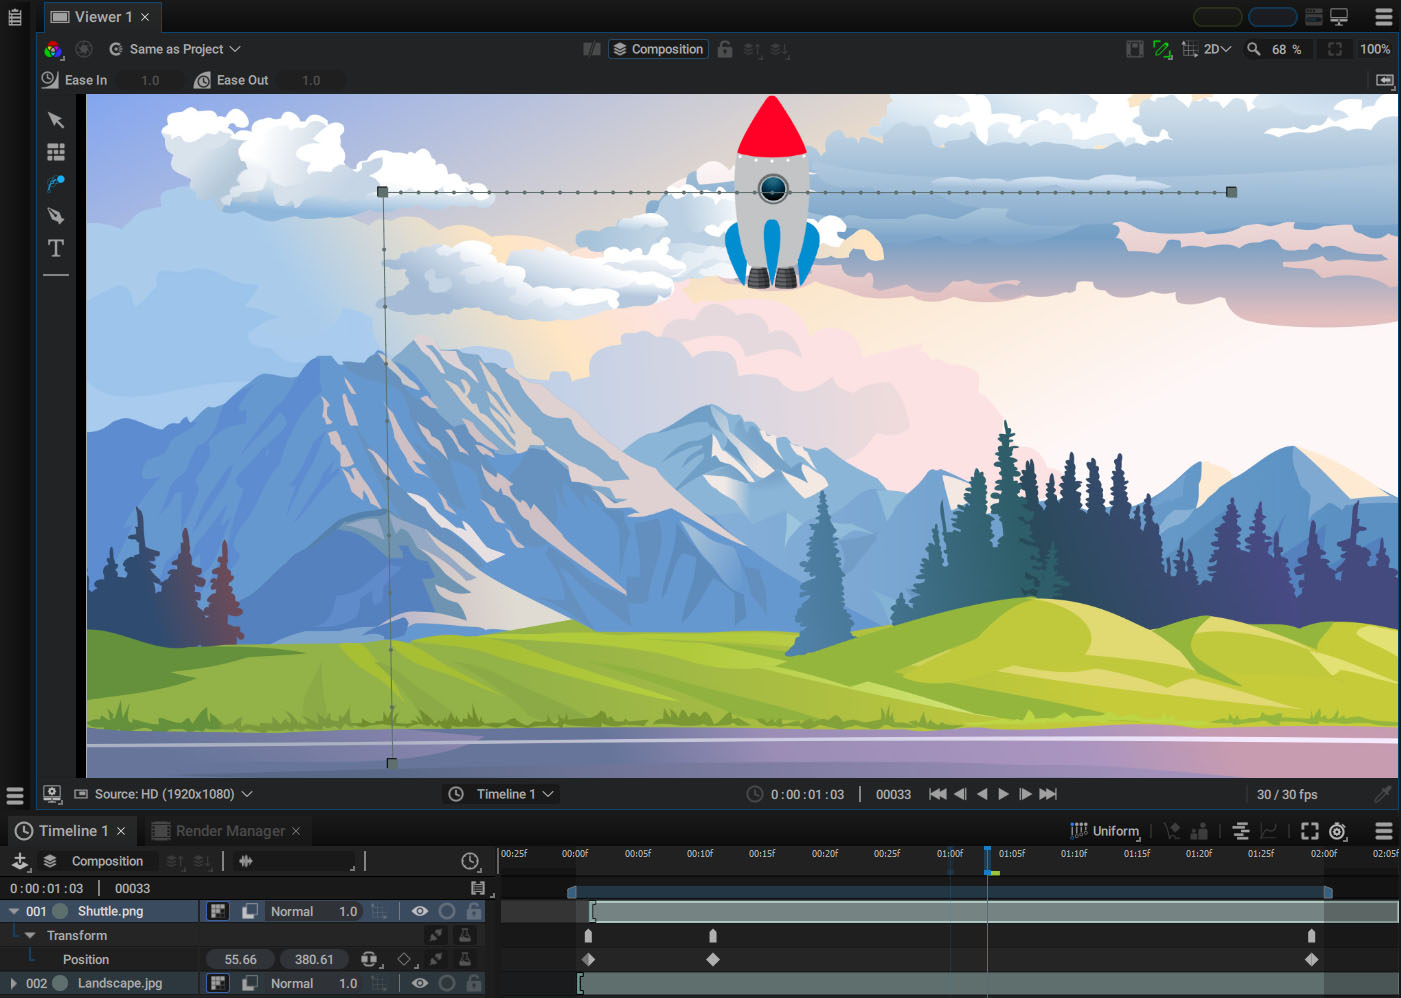
If the animated parameter is a 2D spatial parameter, such as Position, a Motion Path will appear in the Viewer.
This Motion Path represents the layer's trajectory through time, separating the animation process into two distinct aspects:
- The layer's trajectory
- How the layer moves along this trajectory over time
Tweaking the Motion Path alter's the layer's trajectory, while moving keyframes in the Dopesheet and using the Curve Editor, especially in Retime Graph mode, determines how the layer moves along this trajectory over time.
In this section, we'll focus on the second aspect. Bear in mind, however, that each Motion Path point in the Viewer corresponds to a Keyframe in the Timeline.
Simply select one or the other to see this first hand, as shown in the video below:
Info
After Effects users will find silimarities here with the way animation is done in Adobe's software. However, we'll see later that the methods used are somewhat different and allow for more possibilities.
Working with keyframes and removing animations
The pie menu that appears when you click on the keyframe button allows you to perform several actions with a single controller.
Here are the functions from left to right:
- If no keyframe exists at the current time: add a keyframe
- If a keyframe exists at the current time: delete the keyframe
- Move to the nearest keyframe before the current time
- Move to the nearest keyframe after the current time
- Completely remove animation for this parameter

After clicking on a single button, the pie menu will automatically close. To leave it open and click on the same button more than once, hold down the Ctrl/Cmd key. This is especially useful when you want to click on the next/previous keyframe buttons several times.
Note
To quickly display the keyframes used by the parameters of the selected layer(s), press the U key, as described in the filtering the stack section of the Timeline documentation.
Keyframe Properties Dock and Changing Time Interpolation
By moving the playhead between two keyframes, we can see that:
- The contents of the Keyframe button now show a hollow diamond, indicating that at least one keyframe exists on this parameter, but not at the current time.
- The background color of parameter values is now medium gray, again indicating that the parameter is animated, but that no keyframe exists at the current time.

Linear Interpolation:
The almost universal symbol used by all software to define a keyframe is the diamond. Historically, there was only one interpolation type when the concept first appeared, known as Linear IntERPolation (also known as LERP).
Linear interpolation between two different keyframes added to a parameter lets it evolve from one state to the next at a constant speed. This last point is very important. In the case of Position, our rocket will move along the trajectory without any acceleration/deceleration.
Keyframe Properties Dock:
Linear inperpolation is the default mode assigned to each keyframe when it is created. This is why the diamond symbol is used. But we'll see that there are other symbols in Autograph, representing other interpolation types.
To change the way a value evolves between two keyframes, display the Keyframe Properties Dock by clicking on the button to the right of the Multi Edit menu.
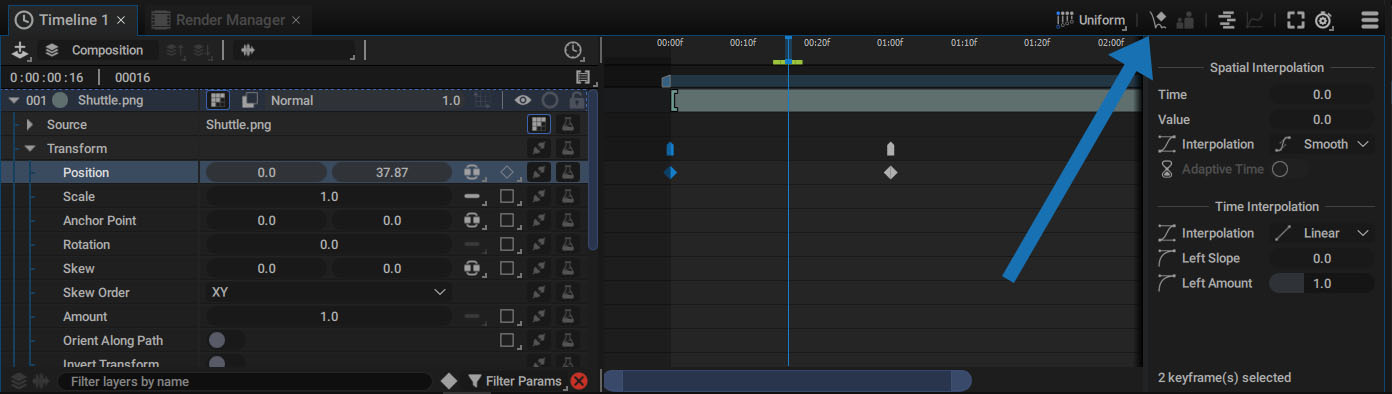
To refresh this dock, you need to select at least one keyframe. In the image above, the first one is selected.
There are two sections in this dock:
- Spatial Interpolation: affects the Motion Path curvature at the selected point
- Time Interpolation: affects the temporal interpolation from the selected keyframe to the next one
Here we'll only focus on the Time Interpolation section.
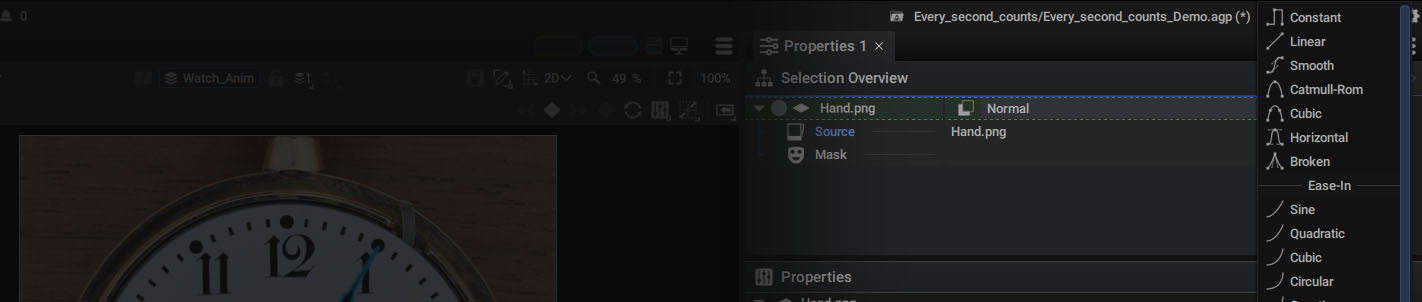
Changing the Time Interpolation Type:
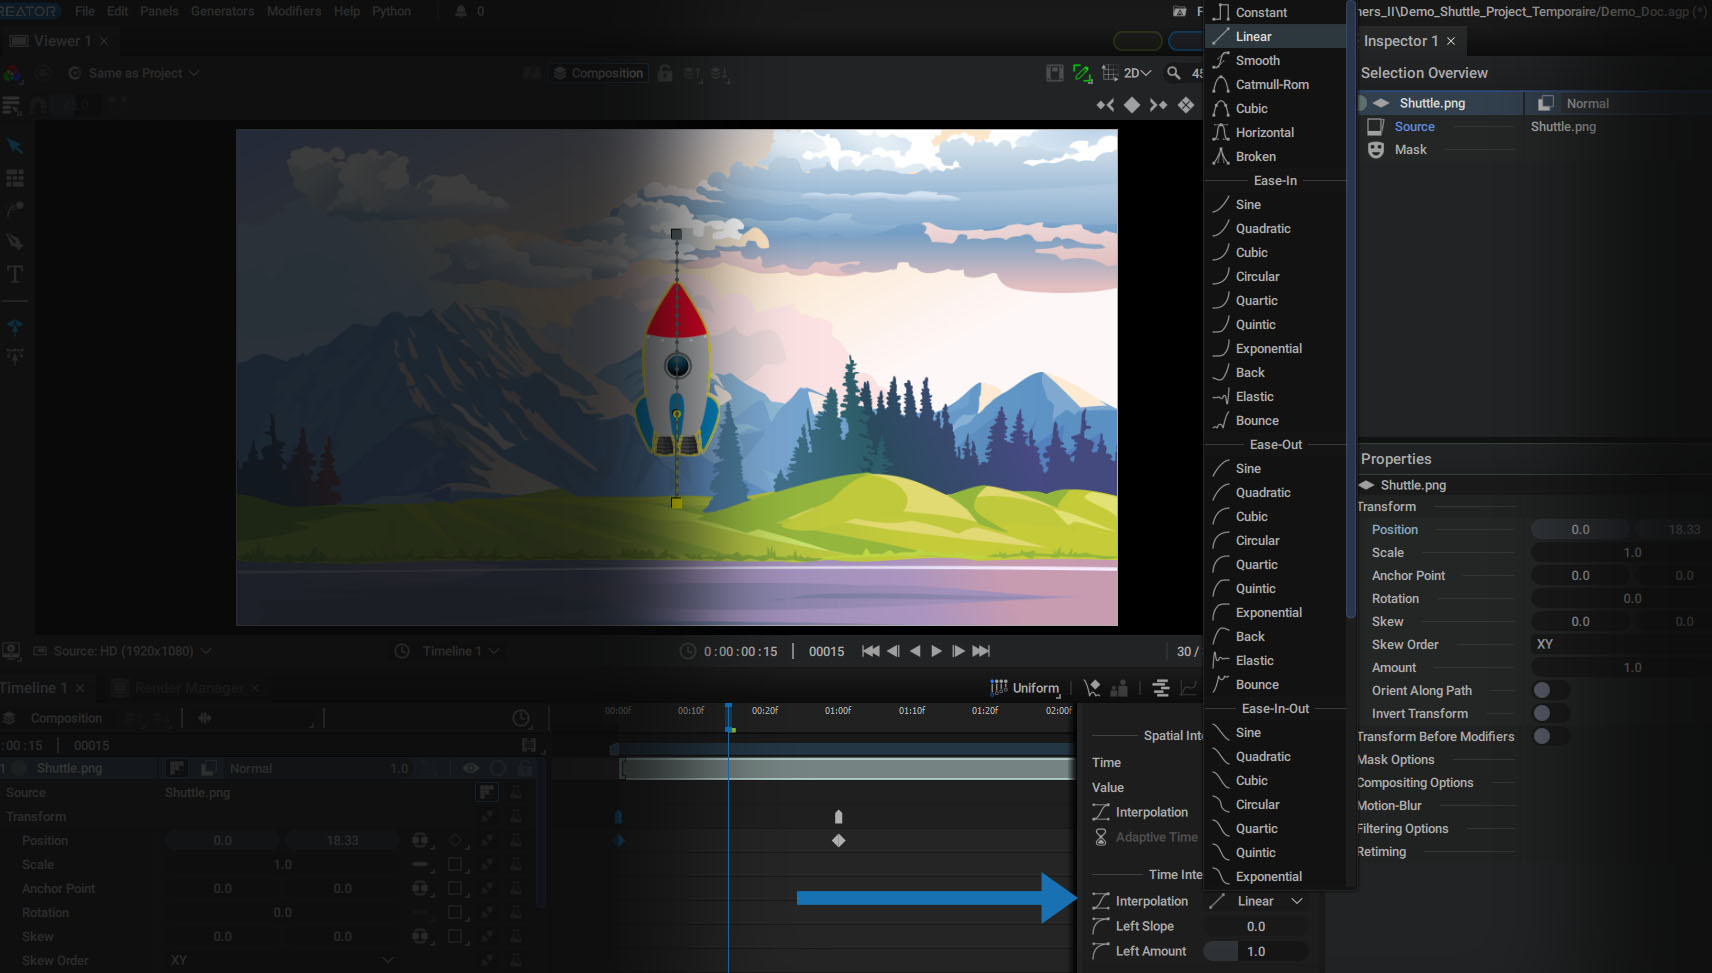
In the image above, we see that the Time Interpolation > Interpolation parameter for the first selected keyframe is in Linear mode.
By clicking on this parameter, you can assign 48 different interpolations to this keyframe:
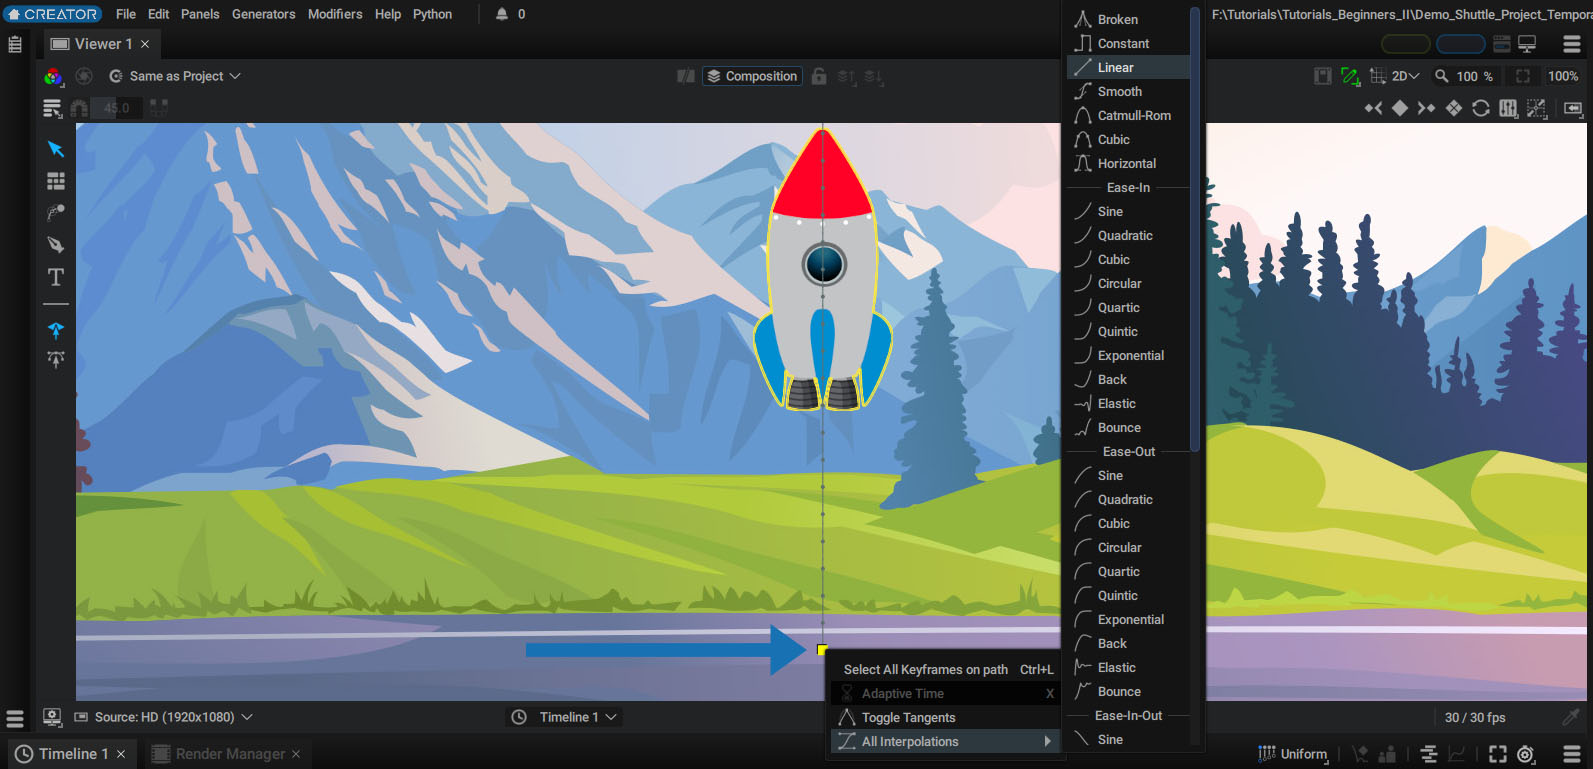
Right-clicking on one of the Motion Path points opens an All Interpolations section, where you can also modify this parameter for the corresponding keyframe without going through the Keyframe Properties Dock in the Timeline.
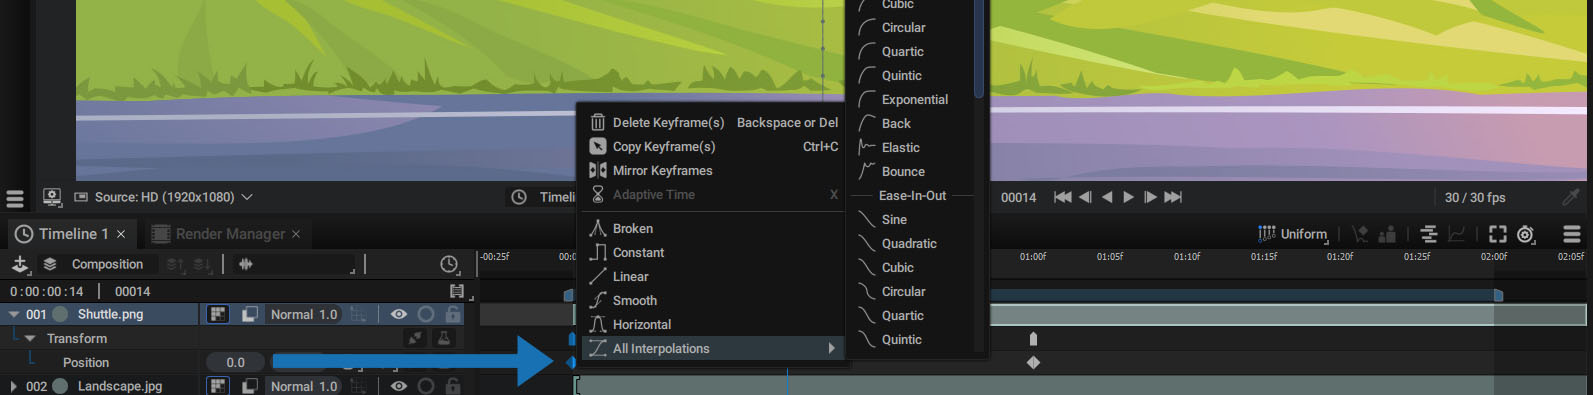
Right-clicking on a keyframe in the Timeline also opens a menu that contains different options:
- Delete selected keyframes
- Copy selected keyframes (before pasting them, see below)
- Mirror selected keyframes (including their interpolations)
- The 5 most common interpolation types (Broken, Constant, Linear, Smooth, Horizontal)
- An All Interpolations section again, with all available interpolations
Warning
Bear in mind that no matter which interpolation type you choose, it won't affect the trajectory defined by the Motion Path, but only the way the layer moves along it.
Time Interpolation Type
Interpolation Before and After the Keyframe:
Looking at the first keyframe, we can see that the diamond is made up of two parts:
- The left part appears grayed-out
- The right-hand part appears brighter

These two parts tell us whether a key has an influence on interpolation with the previous key, as well as with the next key.
If the left-hand side of a key is grayed out, this means that the previous key alone controls the evolution of the parameter, without the current key having any influence whatsoever on this interpolation.
Among the 48 interpolations available in Autograph, only a small number have an influence before and after the current keyframe.
- Linear
- Smooth
- Catmull-Rom
- Cubic
- Horizontal
- Broken
These are the interpolations at the top of the list in the first group, with the exception of Constant.
All of the interpolations on this list are presets, with the exception of Broken, which is a custom mode that allows you to modify all interpolation parameters:
- The orientation of temporal tangents
- The tension of these tangents
No matter the interpolation type used, if you manually modify a tangent in the Curve Editor, in Value Graph mode_ or Retime Graph mode, the type will automatically switch to Broken.
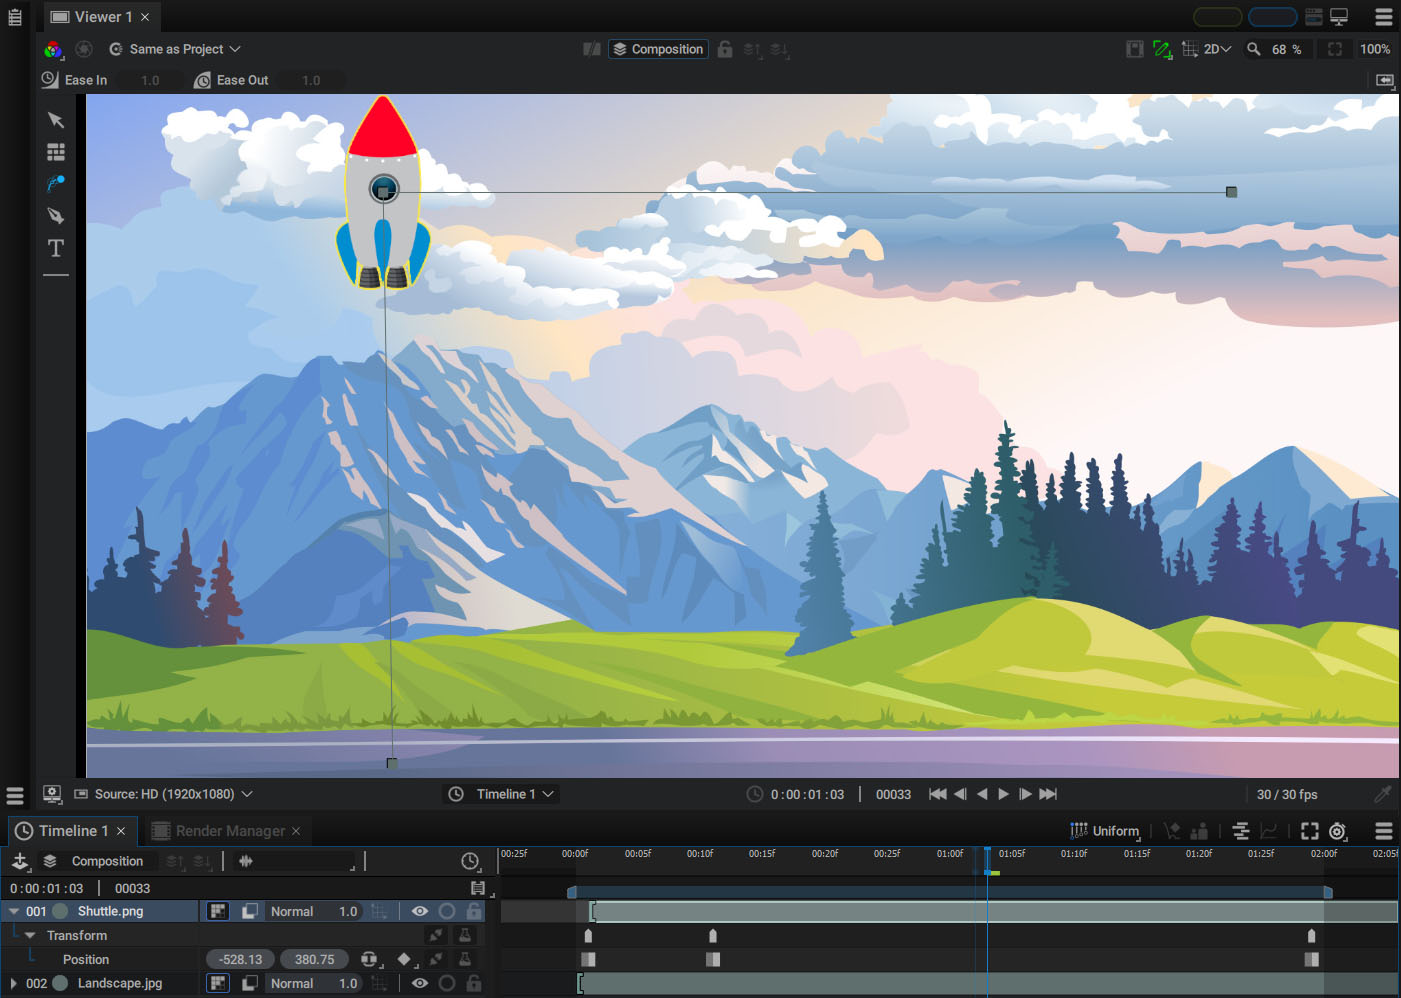
Linear Mode Applied to All Keyframes:
Here we see that only the first keyframe has its left-hand part grayed out, not interacting with any previous keyframes. In the Viewer, the dot distribution between keyframes is uniform, indicating a constant speed between each keyframe.
However, the dots are fewer and further apart in the vertical part of the trajectory. This is because the first and second keyframes are closer together, requiring fewer frames to cover the distance.
Constant Mode Applied to All Keyframes:
In the Viewer, no intermediate points are visible between keyframes. This means that the rocket jumps directly from one keyframe to another without interpolation.
When the playhead is to the right of a key, the value it defines is maintained until the next key. The following key has no influence on the previous one.
This is why the left-hand side of these keys is grayed out. The icon used to represent Constant keys is a square.
Horizontal Mode Applied to All Keyframes:
The dot distribution on the Motion Path shows acceleration when leaving the key and deceleration when approaching the next one.
This can be seen by analyzing the parameter's evolution in the Retime Graph:

Note that these flat tangents (hence the name Horizontal) are dotted, indicating that they're automatically controlled by Autograph.
The icon used to represent Horizontal keys is a circle.
Info
This mode produces the same acceleration and deceleration as the Easy Ease In/Out types in After Effects.
Smooth, Catmull-Rom, and Cubic Mode Applied to All Keyframes:
These three modes, which also use the circle symbol in the Timeline, automatically calculate tangents according to three different tension types, while ensuring temporal continuity.
Broken: the most Frequently Used Mode:
The slightest manual adjustment of a tangent in the Curve Editor will set the key to Broken mode. The symbol used for this key is also the circle, with the difference that tangents in the Curve Editor are not dotted, as they are manually controlled by the user.
Ease In/Out interpolations
All the other interpolations on the list are separated into four groups:
- Ease In
- Ease Out
- Ease In-Out
- Ease Out-In
The symbol used to represent this type of key in the Timeline is made up of two interlocking curved parts.

This key type has the particularity of completely taking control of the interpolation on the right-hand side, up to the next key. This is why the left-hand side of the symbol will always be grayed out.
To see the influence of each interpolation, switch to the Retime Graph, select the keys, and move your mouse over the list.
Complex Animation with Just a Few Keyframes:
In the following example, we animate the clock hand by adding a new keyframe every second, reducing the Rotation value by -30 degrees each time.
To achieve the same result, two keys at the beginning and end of the animation would have been enough. But by adding these intermediate keys, we can now change the interpolation to Elastic or Bounce mode.
Info
The final project animating this clock is available in the Welcome Screen assets. You'll notice that rather than adding an infinite number of keyframes to the Rotation parameter, the hand contains just two keyframes, and the Loop Animation Modifier is used to automatically shift the hand by -30 degrees on each cycle.
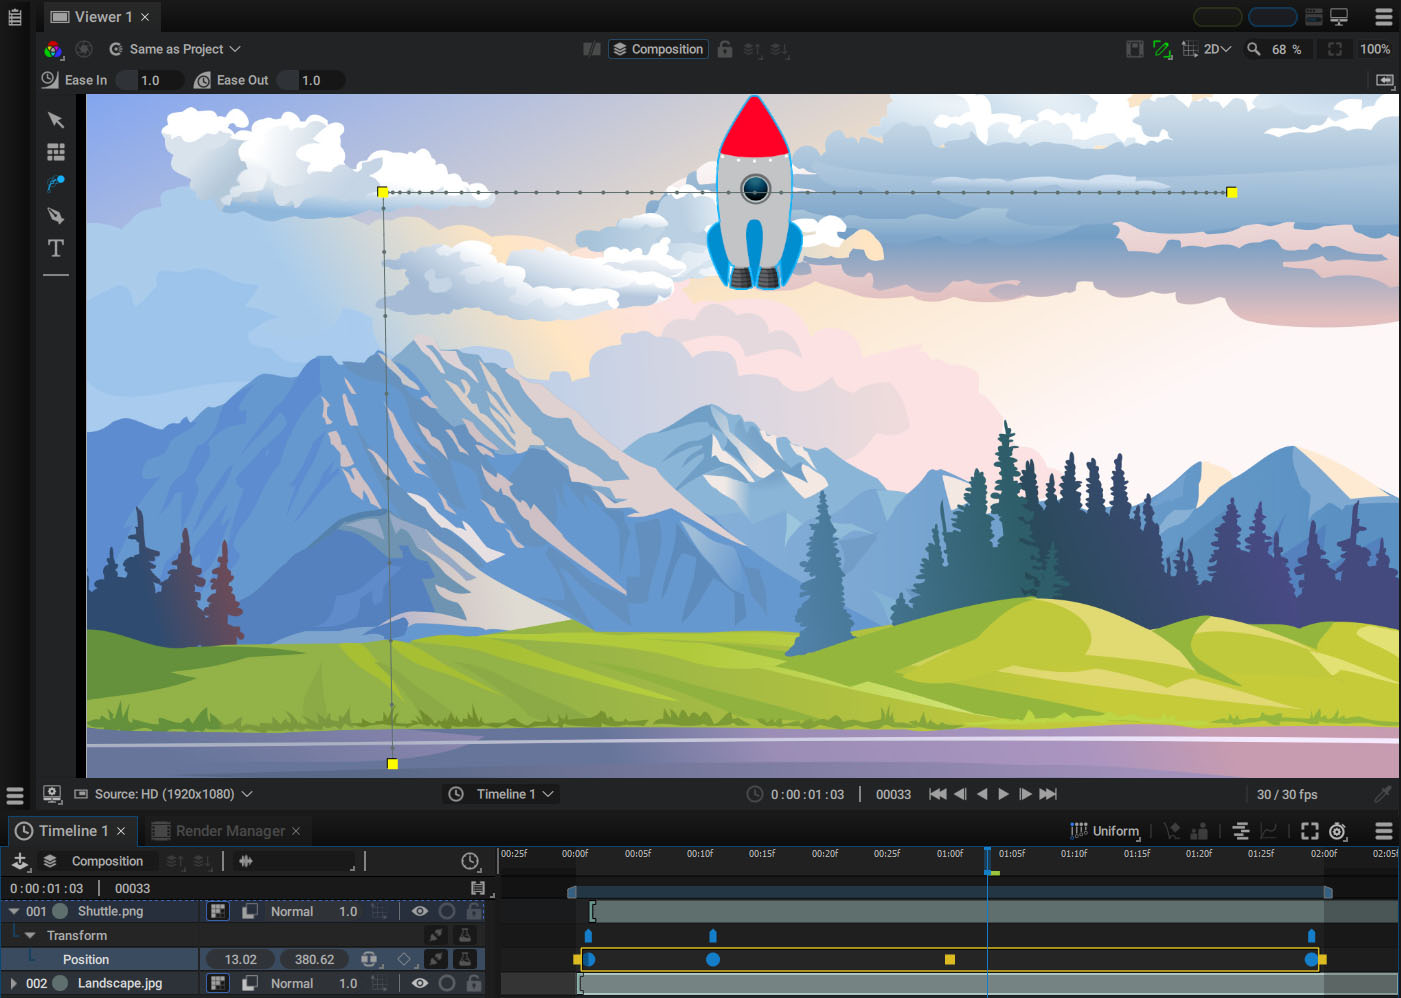
Time Stretching A Group of Keyframes
To speed up or slow down the evolution of a parameter animated by keyframes, select the keys and resize the yellow box surrounding them.
Adaptive Keyframes
As explained at the beginning of this chapter, each Motion Path control point in the Viewer corresponds to a keyframe in the Timeline. This means that each keyframe represented in the Timeline also plays a part in defining the path followed by the layer.
As each keyframe interpolates motion, the distance between them in the Timeline can create abrupt changes in speed. In the example below, 5 keyframes in Linear mode are used to define a curved path.
By moving keys in time, you can see the dots in the Viewer move closer or further apart on each section of the trajectory.
Achieving a constant speed over the entire path, or an acceleration and deceleration spread over the trajectory, becomes very difficult.
To help with this, some keys can be switched to Adaptive Time mode. In this case, they are only used to spatially define the layer's trajectory, but the time at which they are in the Timeline is automatically managed by Autograph, according to the position of the two adjacent keys not using this mode.
When moving one of the two adjacent keys, we can see that the trajectory does not change in the Viewer, but that the Adaptive Keys move in the Timeline.
- To clearly identify this keys in the Timeline, a key in Adaptive Time mode is drawn with a small circle
- These keys in the Viewer are also drawn with a small circle rather than a slightly larger square
Note
For After Effects users, the concept is identical to that of Roving Keyframes.
To quickly switch keys to Adaptive Time mode without going through the menu, select one or more keys and press the X key.
Warning
Manually moving an Adaptive Key in the Timeline will automatically deactivate this mode.
For a keyframe to be set to Adaptive Time mode, it must be surrounded by two keys that do not use this mode. The first and last keyframes of an animation, for example, cannot use this mode, which will be grayed out.
Adaptive Time and Retime Graph:
In the video below, switching the intermediate keys to Adaptive Time mode allows you to move the layer at a constant speed no matter the trajectory, or to distribute progressive acceleration over the entire distance.
Controlling the layer's movement along this trajectory is done via the Curve Editor's Retime Graph mode.
Note that keyframes in Adaptive mode do not appear in the Retime Graph. Since the purpose of this module is to control the movement of a layer along its Motion Path over time, this makes it easy to manage acceleration and deceleration between adjacent keyframes.
Meta Keys
When keyframes are added to one of the Transform section's parameters, special keys called Meta Keys appear on the parameter line.

Selecting and moving these keys allows you to move dozens of keys from different transformation parameters in a single action, even when the Transform section is folded.

The ability to select these Meta Keys can be disabled so that you can draw a selection rectangle without taking them into account.
This option is described in the Timeline selection options.
Adding Keyframes Using Viewer Controls
Adding keyframes or resetting the most common transformation parameters can be done in the Viewer, without going through the Timeline or the Inspector Properties Section.
At the top-right of the Viewer, there are several buttons as well as a dialog box that lights up when at least one layer is selected.

From left to right, there are several buttons with the following functions:
- Jump to the previous nearest keyframe
- Add a keyframe to the current time, or delete the keyframe if one already exists
- Jump to the next nearest keyframe
- Delete all animations
- Reset parameters to default values
When jumping to the next/previous key and adding/deleting keyframes, you can set which transformation parameter should be used through the drop-down menu box to the right of these controllers.
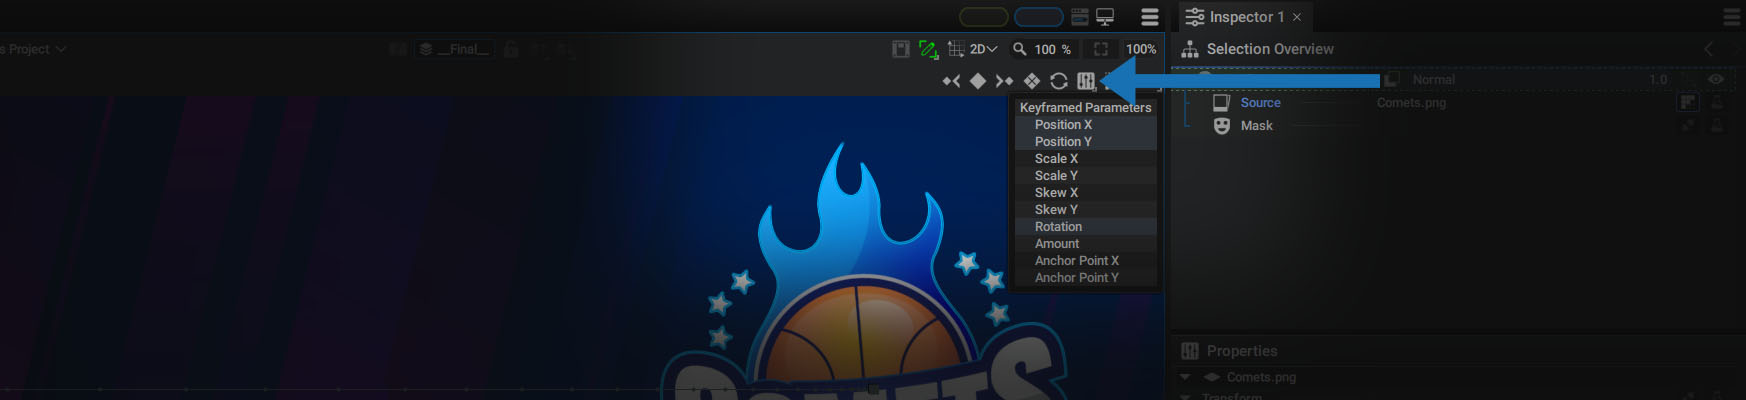
Keframed Parameters List:
Clicking on this button brings up a list of all Transform parameters, which can be activated independently.
- Press Ctrl/Cmd to activate them one by one
- Press Shift followed by two clicks to activate a group of parameters
Once these parameters have been activated, simply click on one of the controllers to perform the desired action on it.
Here are two important time-saving points when animating a layer:
- Position X and Position Y parameters are enabled by default
- Pressing the I key adds a keyframe to the activated parameters
Info
For Blender users, this menu is the same as the Active Keying Set menu at the bottom of the interface, in the Timeline module.